|
|
Installation of this ventilator should only be performed by a qualified
professional who has read and understands these instructions and is familiar
with proper safety precautions. Improper installation poses serious risk of
injury due to electric shock, contact with rotating equipment and other
potential hazards. Special considerations resulting from high winds or seismic
activity may be required. Consult with a licensed professional engineer for more
information if necessary.
|
- Wheel must be free to rotate and should not strike or rub any stationary
object.
- Follow all local electrical and safety codes, as well as the National
Electrical Code (NEC), the Occupational Safety and Health Act (OSHA),
and the National Fire Protection Association (NFPA), where applicable.
- Motor must be securely and adequately grounded.
- Fan Wheel should not run at speeds higher than specified for motor
furnished (see product catalog) with the ventilator at any given HP.
Adjustments to fan speed significantly effect motor load. If the fan
RPM is changed, the motor current should be checked to be sure it is not
exceeding the motor nameplate amps.
- Always disconnect power before working on or near a fan. Lock and tag
the disconnect switch or breaker to prevent accidental power up.
- Caution-when servicing fan, motors may be hot enough to cause pain or
injury. Allow Motor to cool before servicing.
- Secure the power cable to prevent contact with sharp objects.
- Do not kink power cable and never allow the cable to come in contact
with oil, grease, hot surfaces or chemicals.
- Make certain that the power source is compatible with the requirements
of your equipment.
|
|
|
WARNING: DISCONNECT POWER BEFORE INSTALLING OR SERVICING.
|
|
Caution: Do not raise ventilator by the intake hood, impeller, motor or
bearings – use lifting lugs provided or a sling or platform.
|
|
- Ventilators are designed for installation atop a prefabricated or
factory built roof curb. Follow manufacturer’s instructions for proper
curb installation. Be sure duct connection, damper location and fan
outlet are properly aligned.
- If a backdraft damper is required, it must be motorized, it should be
secured within the curb using sheet metal screws, to the bottom of a
damper box or damper support flanges located below the roof deck. A
time delay should be provided to delay the start of the fan until after
the damper has opened.
- Normally the power cord is brought through the conduit opening located
in the base of the unit.
- Secure ventilator curb through vertical portion of the ventilator base
assembly flange using a minimum of eight (8) lug screws, anchor bolts,
or other suitable fasteners (not furnished). Shims may be required
depending upon curb installation & roofing material.
- Before connecting fan motor to power source verify power line wiring is
de-energized.
- Connect power supply wiring to the motor as indicated on the motor
nameplate or terminal box cover. Make certain that the power source
is compatible with the requirements of your equipment.
- Before powering up fan check ventilator wheel for free rotation.
Re-center if necessary.
- Check all fasteners for tightness.
- Re-install top cover.
- Install intake hood and filters.
|
|
- Before starting up or operating the ventilator, check all fasteners for
tightness. In particular, check the set screw in the wheel hub, bearings
and the fan sheaves (pulleys). With power to the fan OFF or prior to
connecting ventilator to power, turn the fan wheel by hand to be sure it
is not striking the inlet or any obstacles. Re-center if necessary.
- Start the fan up and shut it off immediately to check rotation of the
wheel with the directional arrow on the blower scroll. Reversed rotation
will result in poor air performance, motor overloading and possible
burnout. For units equipped with a single-phase motor check the motor
wiring diagram to change rotation.
- When the fan is started up, observe the operation and check for any
unusual noises.
- Measure fan speed with a reliable tachometer. Motor sheave (pulley) is
variable pitch, and allows for adjustment down from the RPM shown in the
catalog. Excessive speed will result in motor overloading.
- With the air system in full operation and all ducts attached, measure the
current input to the motor and compare with the motor nameplate to
determine if the motor is operating under safe load condition.
- Once the rpm of the ventilator has been properly set, disconnect power
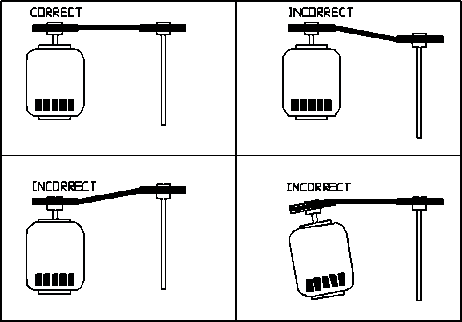
and recheck belt tension and pulley alignment as described below.
Keep inlets and approaches to the ventilator clean and free from obstruction.
|
|
|
|
WARNING: DO NOT ATTEMPT MAINTENANCE ON THE FAN UNTIL THE ELECTRICAL SUPPLY
HAS BEEN COMPLETELY DISCONNECTED.
|
- Fan inlet and approaches to ventilator should be kept clean and free
from any obstruction.
- Motors are normally permanently lubricated. Check bearings
periodically, if they have grease fittings lubricate each season.
Use caution when lubricating bearings, wipe the fittings clean, the
unit should be rotated by hand while lubricating. Caution: Use care
when touching the exterior of an operating motor. Motors normally run
hot and may be hot enough to be painful or cause injury.
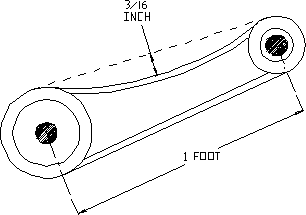
- Belt tension should be checked after two days of fan operation and each
season thereafter. See instructions elsewhere in this manual.
Over-tightening will cause excessive bearing wear and noise.
Too little tension will cause slippage at startup and uneven wear.
- Blowers require very little attention when moving clean air.
Occasionally oil and dust may accumulate causing imbalance. If the fan
is installed in a corrosive or dirty atmosphere, periodically inspect
and clean the wheel, inlet and other moving parts to ensure smooth and
safe operation.
- All fasteners should be checked for tightness each time maintenance
checks are preformed prior to restarting unit.
- Filters need to be cleaned and washed semi annually, more often in
severe conditions.
|
|
|
Problems and Potential Cause
|
|
- Open circuit breaker or overload in starter set too low.
Reset circuit breaker or check setting of overload.
- Motor wired incorrectly. Check motor wiring to wiring diagram located on fan
motor.
|
- Fan rotating in the wrong direction. Be sure fan is
rotating in the direction shown on rotation label.
- Poor inlet conditions. There should be a straight clear
duct at the inlet.
- Be sure duct access doors are closed and dampers are
operating properly.
|
- Belts too loose, worn or oily. Inspect and replace if
needed.
- Misaligned pulleys. Refer to “Pulley Alignment” section.
- Fan speed is too high. Refer to “Motor Pulley Adjustment”
section.
- Fan rotating in the wrong direction. Be sure fan is
rotating in the direction shown on rotation label.
- Bearings need lubrication or replacement.
- Damaged or unbalanced wheel.
- Fan is operating in the unstable region of the fan curve.
|
- Fan rotating in the wrong direction. Be sure fan is
rotating in the direction shown on rotation label.
- Fan speed is too high. Refer to “Motor Pulley
Adjustment”.
- Motor wired incorrectly. Check motor wiring to wiring
diagram located on fan motor.
- Overload in starter set too low.
| |
|
|
|
Warranty
This equipment is warranted to be free from defects in materials and workmanship, under normal use and
service, for a period of 24 months from date of shipment. This warranty shall not apply if:
- The equipment is not installed by a qualified installer per the MANUFACTURER'S installation
instructions shipped with the product,
- The equipment is not installed in accordance with federal, state and local codes and regulations,
- The equipment is misused or neglected,
- The equipment is not operated within its published capacity,
- The invoice is not paid within the terms of the sales agreement.
The MANUFACTURER shall not be liable for incidental and consequential losses and damages
potentially attributable to malfunctioning equipment. Should any part of the equipment prove to be
defective in material or workmanship within the 24-month warranty period, upon examination by the
MANUFACTURER, such part will be repaired or replaced by MANUFACTURER at no charge. The
BUYER shall pay all labor costs incurred in connection with such repair or replacement. Equipment shall
not be returned without MANUFACTURER'S prior authorization and all returned equipment shall be
shipped by the BUYER, freight prepaid to a destination determined by the MANUFACTURER.
|
|
|
|