|
|
|
|
|
|
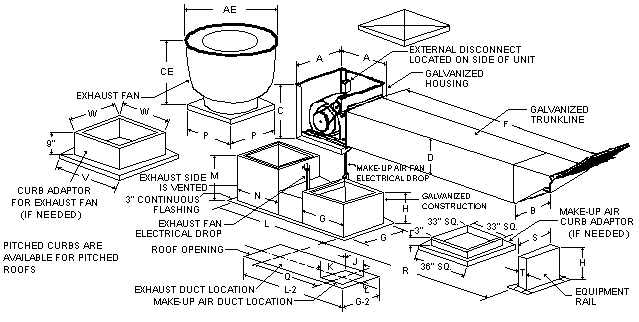
If a combined exhaust/make-up air unit (RTP) is supplied with the job, proceed as follows:
|
- Refer to components drawing in the "General Information" section.
- Determine the location of the hood in the building from the plans and
job specs.
- Draw an outline of the hood on the floor exactly where it will be positioned.
- Determine and mark the center line of the main exhaust duct where it will
penetrate the roof deck. (This point may or may not be the same as the exhaust
riser on the hood since a pantleg duct or offset duct may have to be used.)
- Extend the exact center of the exhaust duct straight up to the roof, using
a plumb bob. Punch a hole through the roof deck at this point. This is the
exhaust center.
- Re-check your measurements to be sure the hole will be cut properly.
- Locate the punched hole on the roof. Draw center lines on the roof the same
as the center lines of the main exhaust duct and determine the proper roof
opening size from the model specific documentation at the job site.
- Mark the opening on the roof and be sure that the exhaust center line drawn
on the roof lines up with the exhaust center line of the curb. Cut the roof
opening.
- Place the curb over the opening and flash it onto the roof deck.
- Place the unit onto the curb, being sure that the exhaust fan section is over
the exhaust duct center line.
- Place the equipment rail on the roof at a distance of 57-1/2" from the
edge of the curb to the make-up air intake side of the unit.
- Flash the rail onto the roof deck.
- Secure the intake air trunkline (with the filter) to the unit with screws.
Caulk the joint.
- Bring power to the unit from the switches through the flex drop.
(Refer to "Wiring the System" section.)
|
|
The drawing below shows a typical rooftop package installation.
|
|
|
For specific dimensional information, please refer to the model specific documentation at
the job site.
|
