|
|
|
|
|
|
The following is a step-by-step procedure for installation
of the ventilation hood.
|
|
- Uncrate the hood, being very careful not to dent or scratch
the outer surface. Report any damage to the delivering
freight carrier and file a claim if appropriate. Check the
nameplate on the equipment to make certain it meets the
specifications provided by the architect/engineer.
(If discrepancies occur, notify manufacturer immediately.)
Refer to the installation drawing for typical details of
the ventilation system prior to hanging hood.

- Position hood on floor in its approximate final position.
- Determine if modification to roof structure is necessary to
accommodate both the hood weight and hood hanging system.
To approximate hood weights, use the guidelines outlined in the:
|
|
Hood Weight Index
|
|
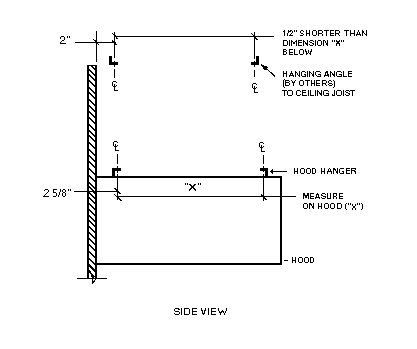
- Use 1/2" threaded rod to
hang hoods. Drill 9/16" holes in the supporting structure to line up with the
welded-on angle mounting brackets on the hood. (The structural integrity of
the structural support system is the responsibility of the contractor and the
structural engineer.) The hole spacing in the angle should line up with the
angle on top of the hood. Refer to the sketch "Side View".
- If hood has a back plenum,
install it now. See the INSTALLING DROP DOWN PLENUM section and refer to Drop
Down Plenum Installation instructions attached to the product.
- The hood should be hung so
that the bottom of the hood is 6'6" from the finished floor, unless otherwise
specified by local authorities having jurisdiction. At this point, proceed to
weld exhaust duct to hood while on floor, if possible. With the hood well
protected against possible scratching, lift the hood into position using high
lifts or equipment jacks. When the hood is elevated to the proper height,
install 1/2" threaded rod between each mounting bracket on the hood and the
modified support. Secure rods with heavy duty nuts and appropriately sized fender
washers. Refer to sketch "Side View".
- If hood has enclosure panels, install them now. See the INSTALLING THE
ENCLOSURE PANELS (WRAPPER) section for Installation Instructions and
refer to instructions attached to product.
- The entire exhaust duct
system must be continuously welded, liquid tight. The duct must be welded to
the hood exhaust collar and the roof curb cap must be welded to the exhaust
duct. (Ductwork installation 'By Others.')
- Threaded rods should be
1/2" closer to the back wall at the top hanger so as to pull the hood against
the wall. Make sure the hood is level.
- Install light bulbs (supplied by others), light globes, and grease filters in the hood.
- Install grease cups in the studs provided.
- Use a stainless steel polish such as "Sheila Shine" to clean
the hood of dust or dirt acquired in transit.
- It is recommended that a protective plastic coating be placed over the
hood until construction is complete, so as to avoid any damage to this
equipment.
- IF HOODS ARE TO BE HUNG BACK TO BACK IN AN ISLAND CONFIGURATION, REFER
TO THE SECTION "INSTALLING CONNECTING HOODS".
|
|
